
Database Maintenance Procedures
Use the following procedure to move your catalog from an old PC to a new PC:
Applicable Release Catalog Location Release 1.23.9 C:\Documents and Settings\xxUserxx\Application Data\DVDR\R1.23.9\DVDReg.mdb Releases 1.21.5 - 1.23.8 C:\Program Files\Laser Disc Register\Release 1.xx\DVDReg.mdb Releases 1.21 - 1.21.4 C:\Program Files\Laser Disc Register\Release 1.xx\DVD Register.mde Releases 1.19 - 1.20 C:\Program Files\Laser Disc Register\Release 1.xx\Laser Disc Register.mde Releases 1.13 - 1.18 C:\Program Files\Laser Disc Register 1.xx\Laser Disc Register.mde Notes: xxUserxx is the name of the user that installed the DVD Register on the PC Release 1.xx is the name of the installed release e.g. "1.23.6 A200x" or "1.23.1 AXP" to a removable storage device such as a recordable CD or DVD. This file contains your personal catalog.
C:\Program Files\Laser Disc Register\Images\...
Create a folder at this location on the new PC and copy all of the image files to this location.
- Click Start>Run and enter regedit.exe then click the OK button
- The registry settings are located at: HKEY_CURRENT_USER\Software\VB and VBA Program Settings\Laser Data Base Expand the registry tree to reveal this location and then select the registry key.
- Use the File>Export command to export the registry key and all subkeys. Give the file a name like DVDReg.reg
- Close the Registry Editor with the File>Exit command
- Copy this file to your new PC.
- On the new PC, right click the file you copied and select the "Merge" command. The settings will be copied to the Windows Registry on your new PC.
If you don't have a removable storage device that can be connected to both PCs, the you can move the file between the two PCs with a network connection.
Lacking either a removable storage device and a network connection you can use the following procedure:
NOTES: A backup file can only be imported by the same release that created the backup. You cannot install a later release on the new PC and import the backup from the old PC created from an older release. Note: Release 1.23.xx will import a backup from Release 1.21.xx
It is a good practice to not discard your old PC until you have verified that the application is working on your new PC and that you catalog was transferred.
Use the following procedure to upgrade your catalog to a new release.
Install the new version of the application on your PC. Do not remove the older version. A newer version (e.g. 1.19 to 1.20) will install in a new folder and will not overwrite your catalog.
Applicable Release Catalog Location Release 1.23.9 C:\Documents and Settings\xxUserxx\Application Data\DVDR\R1.23.9\DVDReg.mdb Releases 1.21.5 - 1.23.8 C:\Program Files\Laser Disc Register\Release 1.xx\DVDReg.mdb Releases 1.21 - 1.21.4 C:\Program Files\Laser Disc Register\Release 1.xx\DVD Register.mde Releases 1.19 - 1.20 C:\Program Files\Laser Disc Register\Release 1.xx\Laser Disc Register.mde Releases 1.13 - 1.18 C:\Program Files\Laser Disc Register 1.xx\Laser Disc Register.mde Notes: xxUserxx is the name of the user that installed the DVD Register on the PC Release 1.xx is the name of the installed release e.g. "1.23.6 A200x" or "1.23.1 AXP"
NOTES: If you reinstall the same release or you install a patch release (e.g. 1.19 to 1.19a) then your personal catalog will be over written by the factory provided database and your personal catalog will be lost.
It is a good practice to verify that the new release is working properly before you uninstall the older release.
Use the following procedure to backup your catalog :
Applicable Release Catalog Location Release 1.23.9 C:\Documents and Settings\xxUserxx\Application Data\DVDR\R1.23.9\DVDReg.mdb Releases 1.21.5 - 1.23.8 C:\Program Files\Laser Disc Register\Release 1.xx\DVDReg.mdb Releases 1.21 - 1.21.4 C:\Program Files\Laser Disc Register\Release 1.xx\DVD Register.mde Releases 1.19 - 1.20 C:\Program Files\Laser Disc Register\Release 1.xx\Laser Disc Register.mde Releases 1.13 - 1.18 C:\Program Files\Laser Disc Register 1.xx\Laser Disc Register.mde Notes: xxUserxx is the name of the user that installed the DVD Register on the PC Release 1.xx is the name of the installed release e.g. "1.23.6 A200x" or "1.23.1 AXP" to a removable storage device such as a recordable CD or DVD. This file contains your personal catalog.
Use the following procedure to restore your catalog from the backup:
NOTES: The above procedure is the most reliable method is recommended if you have a removable storage device like a writable CD or DVD. If you don't have such a device on your PC, then you can use the following procedure:
Use the following procedure to backup your catalog :
Use the following procedure to restore your catalog from the backup:
NOTE: If you are restoring from a backup file after a fresh reinstall, then you should apply the reference catalog updates to the database to bring the reference database current before you restore from the backup file.
NOTE: If you are restoring a backup into Release 1.17, 1.18, 1.19 or 1.20 and your receive a warning message that some records could not be imported due to key violations, then you should read about a workaround for restoring backups.
With Release 1.20 and later you can create a backup automatically every time that you exit the application. Use the Tools:Options command and select the Maintenance Tab. Place a check on the "autobackup" option and close the form. You can also select the location where the backups will be stored such as a location that you periodically backup offline. The automatic backup will rotate the file name six times before over-writing the oldest backup file.
Over time as you use your catalog the database file will grown in size. This is typical of relational databases. Periodically you should compact your database. This will cause the file to shrink in size and have better performance. You should also compact a database after you have done an import from a previous release. There are a couple of different ways to compact your database and they depend upon the version of Access that you are using:
Database Compact Toolkit
Use the Start>Programs>DVD Register>Release XXX>Compact Your Catalog. This shortcut will open the Database Compact Toolkit:
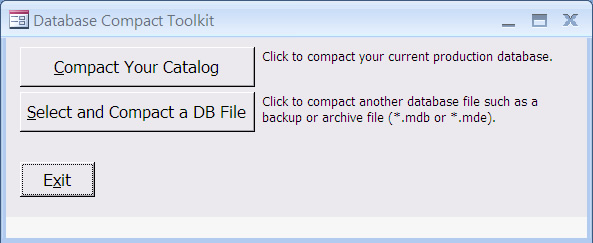
Click the command button "Compact Your Catalog". The compact operations will commence. During the compact process an animation will shows flying folders. It may take a few moments to complete.
The Compact and Repair Tool
The short-cut Start>Programs>DVD Register 1.xx>Repair Your Database open the database compact and repair tool. This program is a little more complicated to set up that the previous two methods but works on both the A97 and A2K versions. There are several options that need to be setup in the tool and you need to be familiar with Windows Explorer to move and copy files. The repair tool cannot compact a database into itself and requires that you compact into a temporary db and then rename the temporary db. Use the following procedure to compact your db with the compact and repair tool.
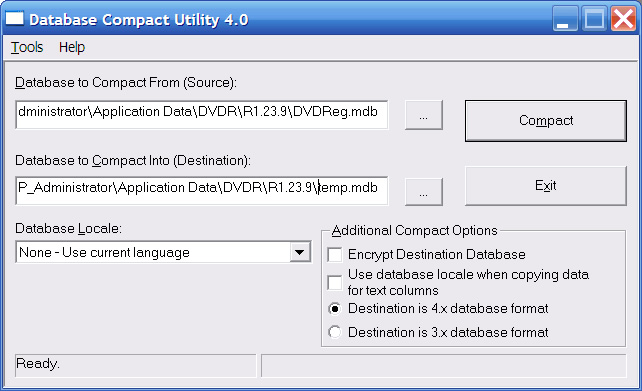
Then select the "Database to Compact From (Source)" to: "DVDReg.mdb". Set the "Database to Compact Into (Destination)" to "temp.mdb". Set the folder for the temp.db to a location that you can find later.
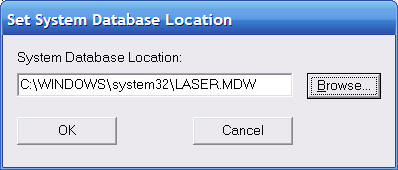
Then using menu command Tools>Set System Database Location to set the system database to: "C:Windows\System32\laser.mdw"
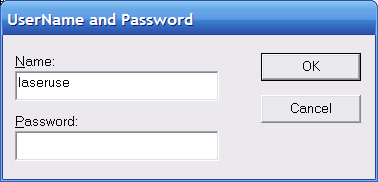
Then using menu Tools>Set User and Password to set the user to:laseruse There is no password for laseruse
Then click the Compact command button. After the compact completes you will need to rename the compacted file so that the DVD Register can find it.:
Rename "DVDReg.mdb" to "Copy of DVDReg.mdb"
Rename "temp.mdb" to "DVDReg.mdb"
![]()